Sample Curriculum – In Person

I often employ a “flipped” classroom for my in-person courses, a format that has received positive feedback from students. This means students cover course material on their own before class. They hand in an “entry ticket” at the beginning of class that with responses to questions that prompt them to critically think about the content they learned. This enables me to assess whether they are actually going through the material beforehand.

Then, in class, we do group activities, play games and discuss them, or give students time to work on their homework assignments. I find this is helpful when teaching classes that require students to develop technical skills, so that I am there to help assist them if they get stuck – and they can empower themselves by helping each other out! When we are present and together, I want students to actively engage with one another instead of zoning out while I lecture.

Below is an example of some of the content for Week 5 of my in-person course Level Design. The full syllabus for this course can be found here.

Here is the week at a glance:
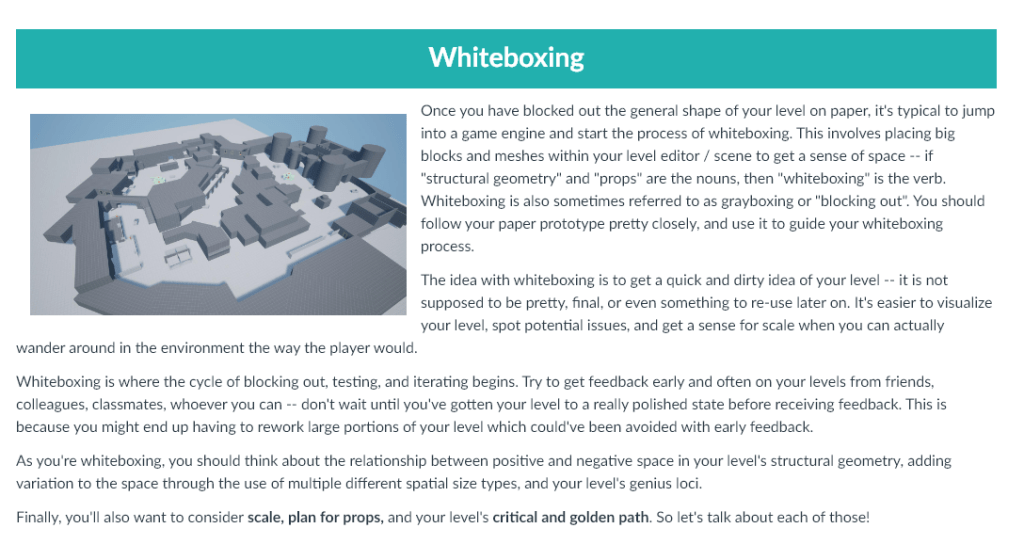
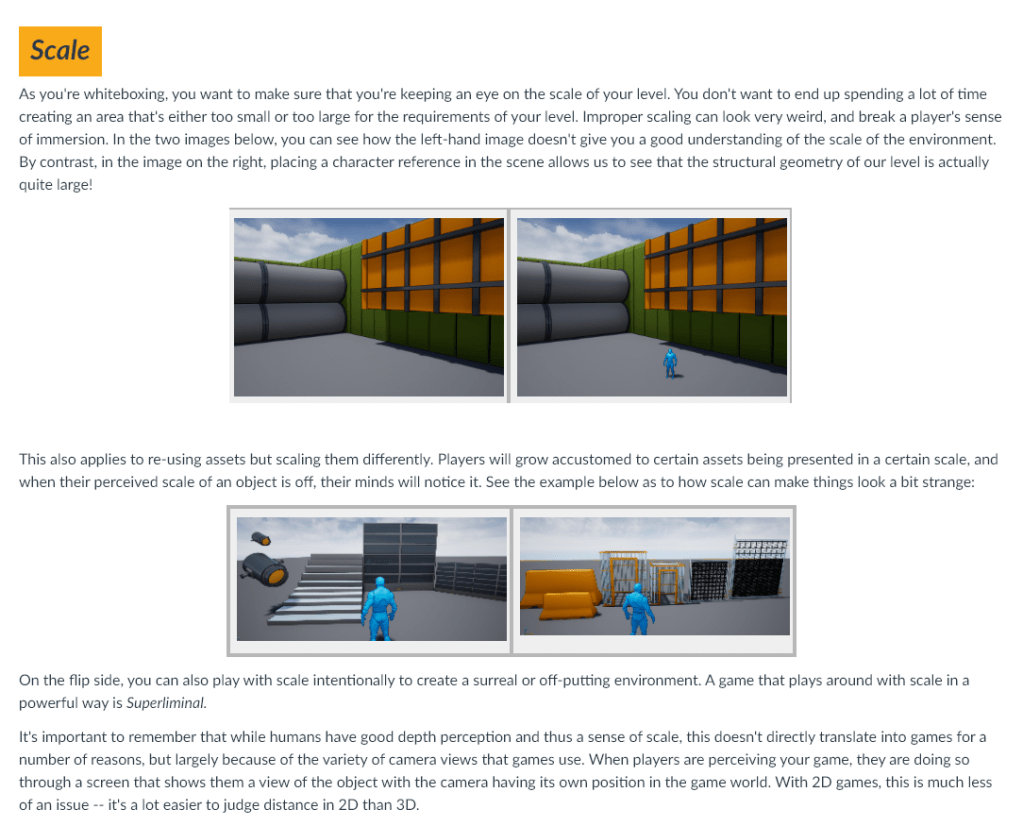
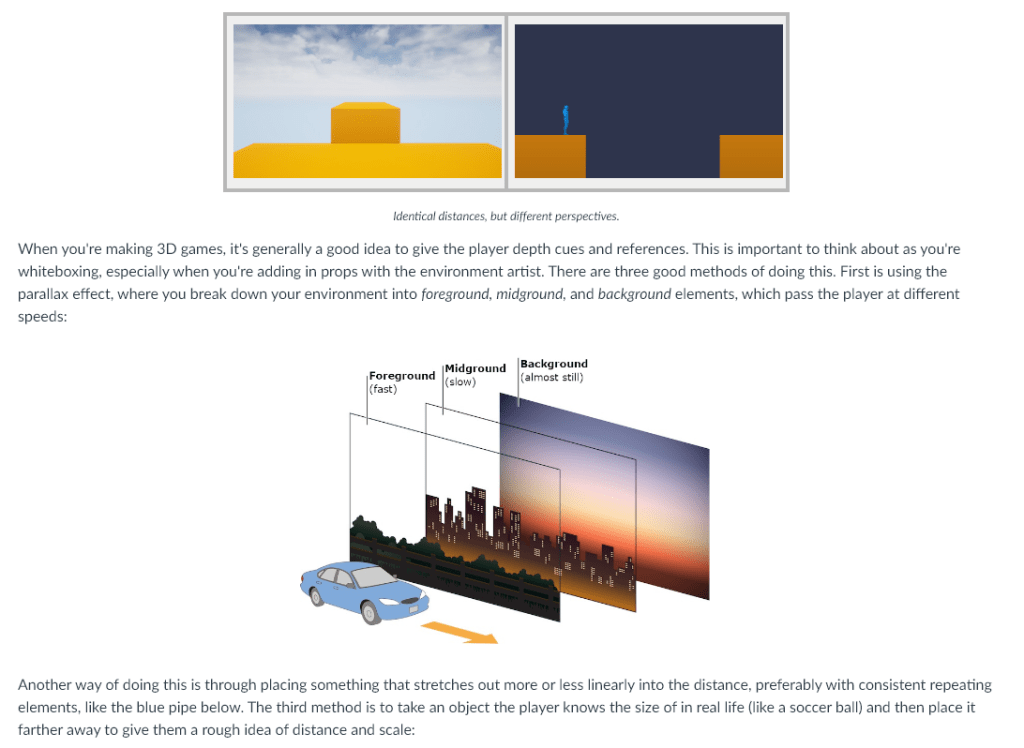
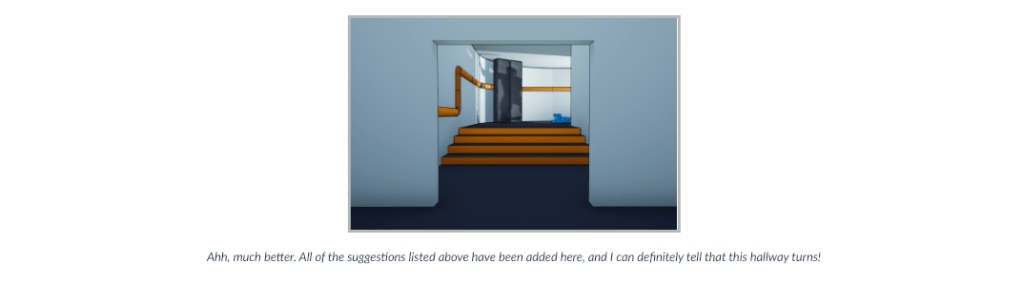
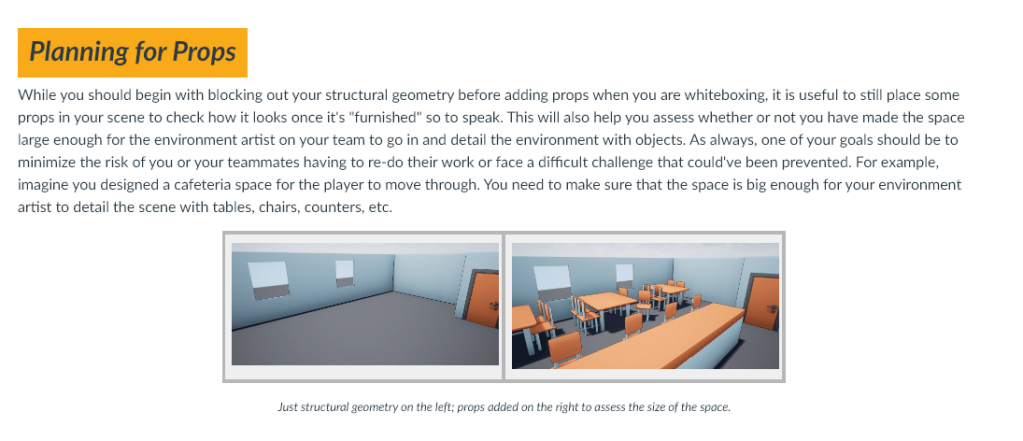
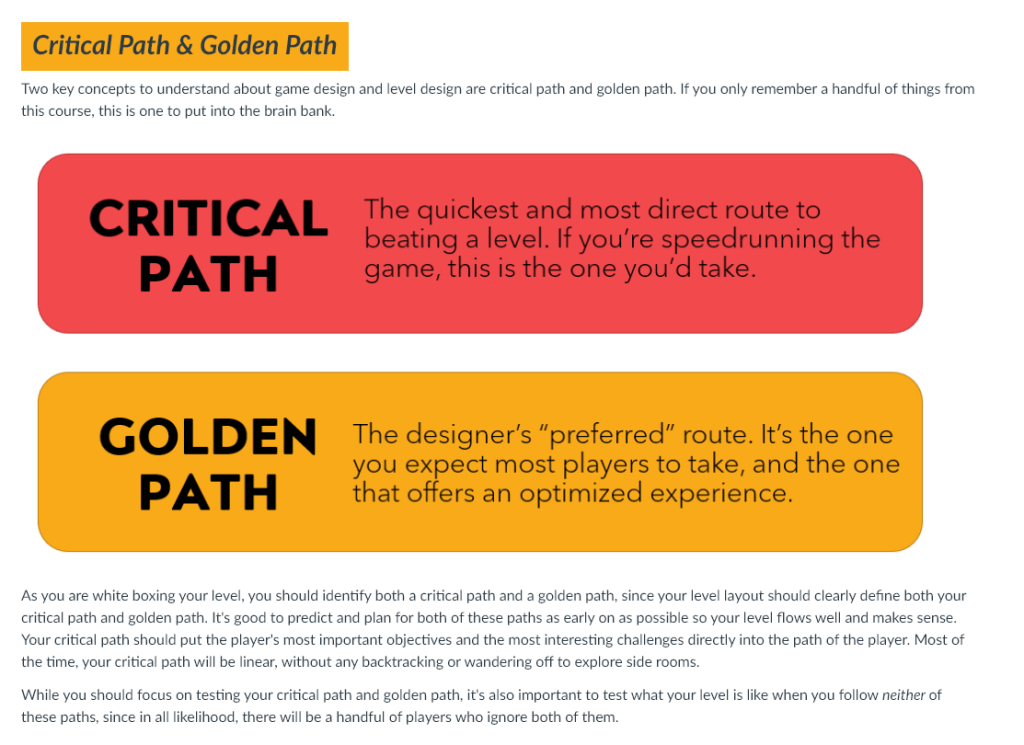
Next, they begin their lesson on whiteboxing.
Last week we learned some fundamental architectural principles. We talked about how different spatial size types can influence the way the player feels (like vulnerable in narrow spaces) due to the concept of spatial empathy. This week, I want us to explore the concept of spatial empathy in more detail and how the specific composition and arrangement of space makes the player feel. You want to think about the player's journey and emotional experience as you iterate and hone your level's structural geometry (discussed below!)

We know that space encodes its own meaning, and can shape the player's emotions -- now let's really get to the bottom of how exactly to do this. I am not talking about art or audio here but rather space / structural geometry / architecture itself. Our main focus this week is learning how the human mind feels about space.

As level designers, one of our main tasks is to construct space. As we know spaces communicate meaning, we should be thoughtful about how we are shaping our levels. We are responsible for creating the structural geometry of levels -- not the art or the bells or whistles, but the placement of the literal geometric shapes and blocks that make up the level:
It's good to think about your intended genius loci for your level and the different emotions shapes can evoke as you are blocking out your level's structural geometry. Circles and spheres usually communicate softness and friendliness, triangles and sharp angles communicate danger or tension, and squares and rectangles are stable and secure -- more on that later!

It's useful to make a distinction between a level's structural geometry and other non-rigid objects (often called "props"). Props are things like cars, benches, or crates. Your level's structural geometry refers to buildings, caves, mountains, pits, walls, etc. You want to begin with your level's structural geometry because it is the backbone of your level's space -- and it is less likely to change or move around than something like a car.
Once you have blocked out the general shape of your level on paper, it's typical to jump into a game engine and start the process of whiteboxing. This involves placing big blocks and meshes within your level editor / scene to get a sense of space -- if "structural geometry" and "props" are the nouns, then "whiteboxing" is the verb. Whiteboxing is also sometimes referred to as grayboxing or "blocking out". You should follow your paper prototype pretty closely, and use it to guide your whiteboxing process.

The idea with whiteboxing is to get a quick and dirty idea of your level -- it is not supposed to be pretty, final, or even something to re-use later on. It's easier to visualize your level, spot potential issues, and get a sense for scale when you can actually wander around in the environment the way the player would. 

Whiteboxing is where the cycle of blocking out, testing, and iterating begins. Try to get feedback early and often on your levels from friends, colleagues, classmates, whoever you can -- don't wait until you've gotten your level to a really polished state before receiving feedback. This is because you might end up having to rework large portions of your level which could've been avoided with early feedback. 

As you're whiteboxing, you should think about the relationship between positive and negative space in your level's structural geometry, adding variation to the space through the use of multiple different spatial size types, and your level's genius loci.

Finally, you'll also want to consider scale, plan for props, and your level's critical and golden path. So let's talk about each of those!
As you're whiteboxing, you want to make sure that you're keeping an eye on the scale of your level. You don't want to end up spending a lot of time creating an area that's either too small or too large for the requirements of your level. Improper scaling can look very weird, and break a player's sense of immersion. In the two images below, you can see how the left-hand image doesn't give you a good understanding of the scale of the environment. By contrast, in the image on the right, placing a character reference in the scene allows us to see that the structural geometry of our level is actually quite large!
This also applies to re-using assets but scaling them differently. Players will grow accustomed to certain assets being presented in a certain scale, and when their perceived scale of an object is off, their minds will notice it. See the example below as to how scale can make things look a bit strange:

On the flip side, you can also play with scale intentionally to create a surreal or off-putting environment. A game that plays around with scale in a powerful way is Superliminal.

It's important to remember that while humans have good depth perception and thus a sense of scale, this doesn't directly translate into games for a number of reasons, but largely because of the variety of camera views that games use. When players are perceiving your game, they are doing so through a screen that shows them a view of the object with the camera having its own position in the game world. With 2D games, this is much less of an issue -- it's a lot easier to judge distance in 2D than 3D.
When you're making 3D games, it's generally a good idea to give the player depth cues and references. This is important to think about as you're whiteboxing, especially when you're adding in props with the environment artist. There are three good methods of doing this. First is using the parallax effect, where you break down your environment into foreground, midground, and background elements, which pass the player at different speeds:

Another way of doing this is through placing something that stretches out more or less linearly into the distance, preferably with consistent repeating elements, like the blue pipe below. The third method is to take an object the player knows the size of in real life (like a soccer ball) and then place it farther away to give them a rough idea of distance and scale:
You want to exercise care when using this technique, however, because there are some objects that don't have fixed sizes in the real world, like trees. Even though players have almost definitely seen a real tree in the real world, it can be hard to tell how tall a specific tree is, especially if your environment artist(s) are using variably sized trees for visual variation. 

A very common issue with scale are hallways and paths that turn in enclosed spaces. In the image below, it can be difficult to tell that the hallway turns to the right at the end:
When you are creating the structural geometry of your level, it's important to make notes of places where scale might mess with a player's understanding of your level layout, and preemptively discuss potential plans to mitigate these issues, like:

Making the entryway into the hallway wider, so the player can see the curve, and which gives the player a short preview of the next area (like the next room)
A light source from around the corner, possibly projecting a silhouette of something (like a person)
Have an environment artist add in an element that the player can visually see or assume continues (like a rug or a pipe)
Showing half of an object the player knows is visually incomplete (like the upper half of a corpse! Delightful!)
While you should begin with blocking out your structural geometry before adding props when you are whiteboxing, it is useful to still place some props in your scene to check how it looks once it's "furnished" so to speak. This will also help you assess whether or not you have made the space large enough for the environment artist on your team to go in and detail the environment with objects. As always, one of your goals should be to minimize the risk of you or your teammates having to re-do their work or face a difficult challenge that could've been prevented. For example, imagine you designed a cafeteria space for the player to move through. You need to make sure that the space is big enough for your environment artist to detail the scene with tables, chairs, counters, etc.
Two key concepts to understand about game design and level design are critical path and golden path. If you only remember a handful of things from this course, this is one to put into the brain bank.

Critical Path: the quickest and most direct route to beating a level. If you're speedrunning a game, this is the one you'd take.
Golden path: the designer's preferred route. It's the one you expect most players to take, and the one that offers an optimized experience.
After you have created a paper prototype of your level, the next step is to block it out in a game engine. This process is called whiteboxing. This will help you get a feel for your level and pinpoint potential problems early on. You should begin by first creating your level's structural geometry, and then add in props to test the size of your spaces. As you whitebox, you should consider your level's scale, size, and test out various ways of moving through your level, paying close attention to your critical and golden paths.

We are going to start in-engine work this week and learn how to whitebox. Get ready!
After they finish the material on whiteboxing, they would go through the next lesson on Molly Bang’s theory of shapes. I am omitting that here but I am happy to share if anyone is curious!
Once students have completed both lessons, they answer questions for their entry ticket.
Please handwrite answers to the following questions and turn them in at the beginning of Tuesday's class this week:

In your own words, how would you describe structural geometry?
What's the difference between a critical path and a golden path?
Do you agree or disagree with Molly Bang's Theory of Shapes? Why?
If applicable: was there anything confusing about this week's material that you would like more clarification on?
In our first class of the week, I teach students how to whitebox using Unreal Engine 5. We also cover landscaping tools.
Before their next class, I have them watch a short lecture video on a new concept:
In our next class, we play two different games that illustrate prospect and refuge as a concept: the Kashyyyk level from Star Wars Battlefront to show how it is used in multiplayer, and Yellow Wind Ridge from Black Myth: Wukong to show how this concept is used in single-player.
With our remaining time, students keep working on their whitebox, adding a prospect and refuge space.